Goodafternoon peeps.
Tonight again a tutorial for you guys.
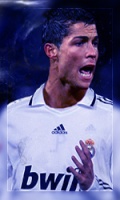
Tonight a tutorial on this signature :

Were gonna start with a new document this one of Ronaldinho is 500x187
Fill the empty Background with the color #232323
Then were gonna put in the render, I choose one of Ronaldinho obviously,
Add in your render,
And erase it , so you can only see his head, and a bit of his shirt
And put it on color dodge 100%.
Duplicate that layer, and put this one on color dodge 20%.
Duplicate that layer, and put it on normal 50%.
This is what you should have so far.

Add in the same render again, But this time, make him a little smaller,,
first render ; Color dodge 100%.
second render ; Color dodge 20%.
third render ; Normal 50%.
This is what you should have.

Now do an apply image
Image > Apply image > Ok.
And smudge the shoulders of your render.
Make a new layer, and take some splatterbrushes
Brush a bit next to the render, en cross off that layer .
Make a new layer, and do an apply image again.
then CTRL+ALT+G, on that apply image layer.
and put your splatter layer back on.
Move the apply image layer, so it fits nice.
add a Photo Filter .
Filter: Yellow.
Density: 25%
on normal 20%.
Make a new layer and with a white softbrush make a lightsource.
Then you should have this :

Add in this texture on the left & right side.

Put it on color dodge 100%
And then this texture on softlight 10%

Then this texture , put it on your render.

Linear dodge 100%
Add a Photo Filter .
Filter: Yellow.
Density: 25%
Do an apply image ;
Image > Apply image > Ok.
and burn the sides a little, with the burntool.
add some splatter clippings.
Make a new layer, and fill it with the color #232323.
put it on lighten 100%.
add this on 1x in the left upper corner.
Softlight 10%
Now for the text
choose a nice font , I chose Old English text.
And type in the name of the player
in the color of your players shirt,
Add some clippings on the text.
Then make a new layer, and put some lightdots on the text
on overlay 100%.
Make some smaller text: Barcelona and do the same as what you did with your main text.
This is what you should have ;

make a apply image.
Image > Apply image > Ok.
And smudge the shoulders a little
Because your lightsource is a little yellow ,
You ar gonna make a new layer > Soft light brush 100px, a new lightsource On top of the old one.
Now a new layer
Filter > Sharpen > Sharpen ; Normal 50%.
Again a new layer
Filter > Other > Highpass > 10,0.
Softlight 50%.
New layer > CTRL+A > EDIT > STROKE > 5px Gray.
And then youre done,
This could be your outcome.

And please show some outcome's.
Hope its usefull
Enjoy It !
Tonight again a tutorial for you guys.
Tonight a tutorial on this signature :
Were gonna start with a new document this one of Ronaldinho is 500x187
Fill the empty Background with the color #232323
Then were gonna put in the render, I choose one of Ronaldinho obviously,
Add in your render,
And erase it , so you can only see his head, and a bit of his shirt
And put it on color dodge 100%.
Duplicate that layer, and put this one on color dodge 20%.
Duplicate that layer, and put it on normal 50%.
This is what you should have so far.
Add in the same render again, But this time, make him a little smaller,,
first render ; Color dodge 100%.
second render ; Color dodge 20%.
third render ; Normal 50%.
This is what you should have.
Now do an apply image
Image > Apply image > Ok.
And smudge the shoulders of your render.
Make a new layer, and take some splatterbrushes
Brush a bit next to the render, en cross off that layer .
Make a new layer, and do an apply image again.
then CTRL+ALT+G, on that apply image layer.
and put your splatter layer back on.
Move the apply image layer, so it fits nice.
add a Photo Filter .
Filter: Yellow.
Density: 25%
on normal 20%.
Make a new layer and with a white softbrush make a lightsource.
Then you should have this :
Add in this texture on the left & right side.
Put it on color dodge 100%
And then this texture on softlight 10%
Then this texture , put it on your render.
Linear dodge 100%
Add a Photo Filter .
Filter: Yellow.
Density: 25%
Do an apply image ;
Image > Apply image > Ok.
and burn the sides a little, with the burntool.
add some splatter clippings.
Make a new layer, and fill it with the color #232323.
put it on lighten 100%.
add this on 1x in the left upper corner.
Softlight 10%
Now for the text
choose a nice font , I chose Old English text.
And type in the name of the player
in the color of your players shirt,
Add some clippings on the text.
Then make a new layer, and put some lightdots on the text
on overlay 100%.
Make some smaller text: Barcelona and do the same as what you did with your main text.
This is what you should have ;
make a apply image.
Image > Apply image > Ok.
And smudge the shoulders a little
Because your lightsource is a little yellow ,
You ar gonna make a new layer > Soft light brush 100px, a new lightsource On top of the old one.
Now a new layer
Filter > Sharpen > Sharpen ; Normal 50%.
Again a new layer
Filter > Other > Highpass > 10,0.
Softlight 50%.
New layer > CTRL+A > EDIT > STROKE > 5px Gray.
And then youre done,
This could be your outcome.
And please show some outcome's.
Hope its usefull
Enjoy It !